در این پروژه که برای ماژول esp32 آماده شده است شما قادرید با کمک برنامه Arduino IDE سورس فریم ورک مورد نظرتون رو برروی این ماژول آپلود کنید و فریم ورک ماژول esp رو مطابق نیازتون تغییر بدین.
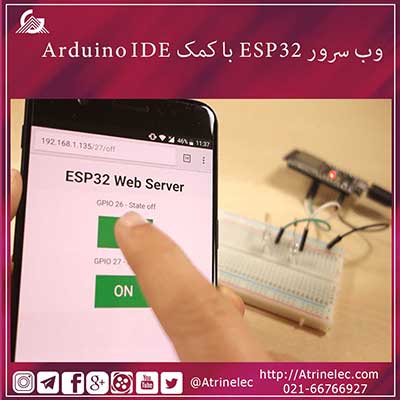
در این پروژه وب سرور ۲ تا از پایه های این ماژول توسط وب سرور و صفحه وب کنترل میشه و میتونید اون پایه ها رو فعال یا غیر فعال کنید.

در این پروژه صفحه نمایش وب سرویس به صورت ریسپانسیو بوده و قابلیت اجرا در موبایل ، تبلت و کامپیوتر را دارد البته همانطور که میدونید برای دسترسی به این صفحه لازمه آی پی ماژول رو بدونید و به همان مودمی که ماژول شما متصل هست متصل باشید
در این پروژه پایه های ۲۶ و ۲۷ به صورت خروجی تعریف شده به LED وصل شده و شما میتوانید این ۲ خروجی رو فعال یا غیر فعال کنید ابتدا ماژول و قطعات رو طبق نقشه زیر ببندید.

در این مرحله سخت افزار شما آمده هست اما برای نرم افزار و شناخت بردتون توی محیط arduino ide نیاز به نصب اون دارید که برای نسخه ویندوز از این لینک و برای نسخه مک و لینوکس از این لینک باید نصب کنید.
خوب در این مرحله به سورس آردوینو میرسیم
.
/*********
  Rui Santos
  Complete project details at http://randomnerdtutorials.com
*********/

// Load Wi-Fi library
#include <WiFi.h>

// Replace with your network credentials
const char* ssid     = "";
const char* password = "";

// Set web server port number to 80
WiFiServer server(۸۰);

// Variable to store the HTTP request
String header;

// Auxiliar variables to store the current output state
String output26State = "off";
String output27State = "off";

// Assign output variables to GPIO pins
const int output26 = ۲۶;
const int output27 = ۲۷;

void setup() {
  Serial.begin(۱۱۵۲۰۰);
  // Initialize the output variables as outputs
  pinMode(output26, OUTPUT);
  pinMode(output27, OUTPUT);
  // Set outputs to LOW
  digitalWrite(output26, LOW);
  digitalWrite(output27, LOW);

  // Connect to Wi-Fi network with SSID and password
  Serial.print("Connecting to ");
  Serial.println(ssid);
  WiFi.begin(ssid, password);
  while (WiFi.status() != WL_CONNECTED) {
    delay(۵۰۰);
    Serial.print(".");
  }
  // Print local IP address and start web server
  Serial.println("");
  Serial.println("WiFi connected.");
  Serial.println("IP address: ");
  Serial.println(WiFi.localIP());
  server.begin();
}

void loop(){
  WiFiClient client = server.available();   // Listen for incoming clients

  if (client) {                             // If a new client connects,
    Serial.println("New Client.");          // print a message out in the serial port
    String currentLine = "";                // make a String to hold incoming data from the client
    while (client.connected()) {            // loop while the client's connected
      if (client.available()) {             // if there's bytes to read from the client,
        char c = client.read();             // read a byte, then
        Serial.write(c);                    // print it out the serial monitor
        header += c;
        if (c == '\n') {                    // if the byte is a newline character
          // if the current line is blank, you got two newline characters in a row.
          // that's the end of the client HTTP request, so send a response:
          if (currentLine.length() == ۰) {
            // HTTP headers always start with a response code (e.g. HTTP/1.1 200 OK)
            // and a content-type so the client knows what's coming, then a blank line:
            client.println("HTTP/1.1 200 OK");
            client.println("Content-type:text/html");
            client.println("Connection: close");
            client.println();

            // turns the GPIOs on and off
            if (header.indexOf("GET /26/on") >= ۰) {
              Serial.println("GPIO 26 on");
              output26State = "on";
              digitalWrite(output26, HIGH);
            } else if (header.indexOf("GET /26/off") >= ۰) {
              Serial.println("GPIO 26 off");
              output26State = "off";
              digitalWrite(output26, LOW);
            } else if (header.indexOf("GET /27/on") >= ۰) {
              Serial.println("GPIO 27 on");
              output27State = "on";
              digitalWrite(output27, HIGH);
            } else if (header.indexOf("GET /27/off") >= ۰) {
              Serial.println("GPIO 27 off");
              output27State = "off";
              digitalWrite(output27, LOW);
            }

            // Display the HTML web page
            client.println("<!DOCTYPE html><html>");
            client.println("<head><meta name=\"viewport\" content=\"width=device-width, initial-scale=1\">");
            client.println("<link rel=\"icon\" href=\"data:,\">");
            // CSS to style the on/off buttons
            // Feel free to change the background-color and font-size attributes to fit your preferences
            client.println("<style>html { font-family: Helvetica; display: inline-block; margin: 0px auto; text-align: center;}");
            client.println(".button { background-color: #4CAF50; border: none; color: white; padding: 16px 40px;");
            client.println("text-decoration: none; font-size: 30px; margin: 2px; cursor: pointer;}");
            client.println(".button2 {background-color: #555555;}</style></head>");

            // Web Page Heading
            client.println("<body><h1>ESP32 Web Server</h1>");

            // Display current state, and ON/OFF buttons for GPIO 26
            client.println("<p>GPIO 26 - State " + output26State + "</p>");
            // If the output26State is off, it displays the ON button
            if (output26State=="off") {
              client.println("<p><a href=\"/26/on\"><button class=\"button\">ON</button></a></p>");
            } else {
              client.println("<p><a href=\"/26/off\"><button class=\"button button2\">OFF</button></a></p>");
            }

            // Display current state, and ON/OFF buttons for GPIO 27
            client.println("<p>GPIO 27 - State " + output27State + "</p>");
            // If the output27State is off, it displays the ON button
            if (output27State=="off") {
              client.println("<p><a href=\"/27/on\"><button class=\"button\">ON</button></a></p>");
            } else {
              client.println("<p><a href=\"/27/off\"><button class=\"button button2\">OFF</button></a></p>");
            }
            client.println("</body></html>");

            // The HTTP response ends with another blank line
            client.println();
            // Break out of the while loop
            break;
          } else { // if you got a newline, then clear currentLine
            currentLine = "";
          }
        } else if (c != '\r') {  // if you got anything else but a carriage return character,
          currentLine += c;      // add it to the end of the currentLine
        }
      }
    }
    // Clear the header variable
    header = "";
    // Close the connection
    client.stop();
    Serial.println("Client disconnected.");
    Serial.println("");
  }
}
البته اگه به کد نگاه بندازید میتونید موارد اون رو متوجه بشید ولی مهمترین بخش تغییرات بخش زیر هست که لازمه نام مودم و رمز مودم رو تو خط برنامه بر اساس مودم خودتون تغییر بدین
.
// Replace with your network credentials
const char* ssid     = "REPLACE_WITH_YOUR_SSID";
const char* password = "REPLACE_WITH_YOUR_PASSWORD";
حالا برد خودتون رو به کامپیوتر وصل کنید ، توی محیط نرم افزار arduino به منو Tools > Board برید و گزینه ESP32 DEVKIT DOIT رو انتخاب کنید

از اونجایی که برد شما یه پورت سریال مجازی میسازه باید پورت رو از منو Tools > Port. انتخاب کنید

حالا همه چیز اماده هست تا سورس رو روی برد اپلود کنید برای این کار بر روی آیکن فلش  کلیک کنید تا آپلود شروع بشه

با اتمام آپلود ، سریال مانیتور رو با باود ریت ۱۱۵۲۰۰ باز کنید تا نتیجه ارتباطات و لود فریم ورک خودتون رو ببنید و البته در این مرحله ای پی ماژول رو هم پیدا خواهید کرد تا بتوند از طریق صفحه وب به اون دسترسی داشته باشید.

همونطور که میبینید آی پی ماژول رو تو مانیتورینگ سریال برای شما نمایش میده

همونطور که میبینید تو این عکس آی پی ماژول رو ۱۹۲.۱۶۸.۱.۱۳۵ نشون داده که البته برای شما متفاوت خواهد بود.حاالا این آی پی رو توی مرورگر خودتون یا موبایلتون که به مودم وصل هست و همون مودم هم به ماژول وصله ، تایپ کنید

کافیه هر کدوم از دکمه های ON و OFF رو فشار بدین تا وضعیت LED ها متصل به GPIO 26 ,GPIO 27 رو ببینید، برای کسب اطلاعات بیشتر میتونید از اینجا به مطلب اصلی این نوشته دسترسی داشته باشید.
در آخر هم یه ویدیو در مورد نحوه عمکلرد کد رو میتونید مشاهده کنید
م